Hardwire Kit for Phone Dashcam: Why Canadian Drivers Need Permanent Power (and How to Install It)
A 12V socket kills parking mode when the ignition cuts off. Learn why Canadian drivers need a hardwire kit and how to install one step by step.
On this page
- Why a 12V Socket Is Not Enough for a Dashcam in Canada
- What a Hardwire Kit Actually Does
- The Voltage Cutoff Module
- Clean, Invisible Installation
- Built for DriveSight
- Voltage Cutoff Settings: The Detail That Protects Your Battery
- Which Setting Matches Your Battery Type
- Why Canadian Winters Shrink Your Margin
- The Five-Second Step Before You Start
- What You Need Before You Start: Tools and Parts
- Required Hardware
- Required Tools
- Optional but Useful
- Before You Open the Fuse Box
- How to Install a Hardwire Kit Step by Step
- What DriveSight Needs to Run Parking Mode Reliably
- How Parking Mode Activates
- What You Get in Driving Mode
- Why Continuous Power Matters for Android
- Common Hardwire Installation Mistakes and How to Avoid Them
- Alternatives to a Hardwire Kit: When They Work and When They Do Not
- Permanent Power Is Not Optional for Canadian Dashcam Drivers
- Conclusion
Your dashcam is only as useful as the power keeping it running. If you have plugged your phone dashcam into a standard 12V cigarette lighter socket, you are missing the most important feature it offers: parking mode. In most modern vehicles, that socket goes dead the moment you turn off the ignition, meaning your dashcam shuts off exactly when you need it most. In Canada, where winter temperatures drain batteries faster and vehicles sit unattended in parking lots for hours, that gap in coverage is not a minor inconvenience. It is a genuine risk.
A dashcam hardwire kit solves this problem at the source. By connecting your dashcam directly to your vehicle's fuse box, a hardwire kit delivers continuous, reliable power independent of the ignition. This guide covers everything a beginner needs to know: how hardwire kits work, which tools and parts you need, how to complete the installation step by step, how to set voltage cutoff correctly for Canadian conditions, and what DriveSight specifically requires to run parking mode reliably. If you want your dashcam to actually protect your vehicle around the clock, this is where you start.
Why a 12V Socket Is Not Enough for a Dashcam in Canada
In most modern vehicles, the 12V cigarette lighter socket is wired through the ignition switch. The moment you turn off the engine, the socket goes dead. For a dashcam running off that socket, that means recording stops completely the instant you park, which makes parking mode functionally impossible without a separate power solution.
That gap in coverage matters more than most drivers realise. Theft, vandalism, and hit-and-run collisions happen overwhelmingly while vehicles are unattended. Without continuous power, your dashcam captures nothing during the exact window when you need footage most. There are different approaches to parking mode, but every one of them shares the same prerequisite: uninterrupted power to the device.
Canadian winters compound the problem significantly. Cold temperatures measurably reduce a battery's effective capacity, increase the current drawn during cold starts, and stretch the hours your vehicle sits exposed in vulnerable locations. A car left overnight in a mall parking lot during a snowstorm, or parked for a weekend at a remote trailhead, is sitting in exactly the conditions where a working dashcam would matter most and where a 12V socket setup provides zero protection.
There is also a second failure mode specific to phone dashcam users. A smartphone drawing continuous power from a 12V socket in sub-zero temperatures is fighting two simultaneous drains: the dashcam app itself and the accelerated self-discharge that cold causes in lithium-ion batteries. The result is predictable. Drivers return to a phone with a dead battery, losing their dashcam footage, their navigation, and potentially their ability to call for help, all at once.
The fix is not complicated, but it is not optional either. A hardwire kit connects your dashcam directly to the vehicle's fuse box, drawing from circuits that stay live regardless of ignition state. It is the infrastructure layer that makes 24/7 recording with parking mode work reliably through a Canadian winter. Everything else in this guide builds on that foundation.
What a Hardwire Kit Actually Does
So what exactly makes a hardwire kit different from plugging into a socket? It comes down to how the kit connects to your vehicle's electrical system and which circuits it uses.
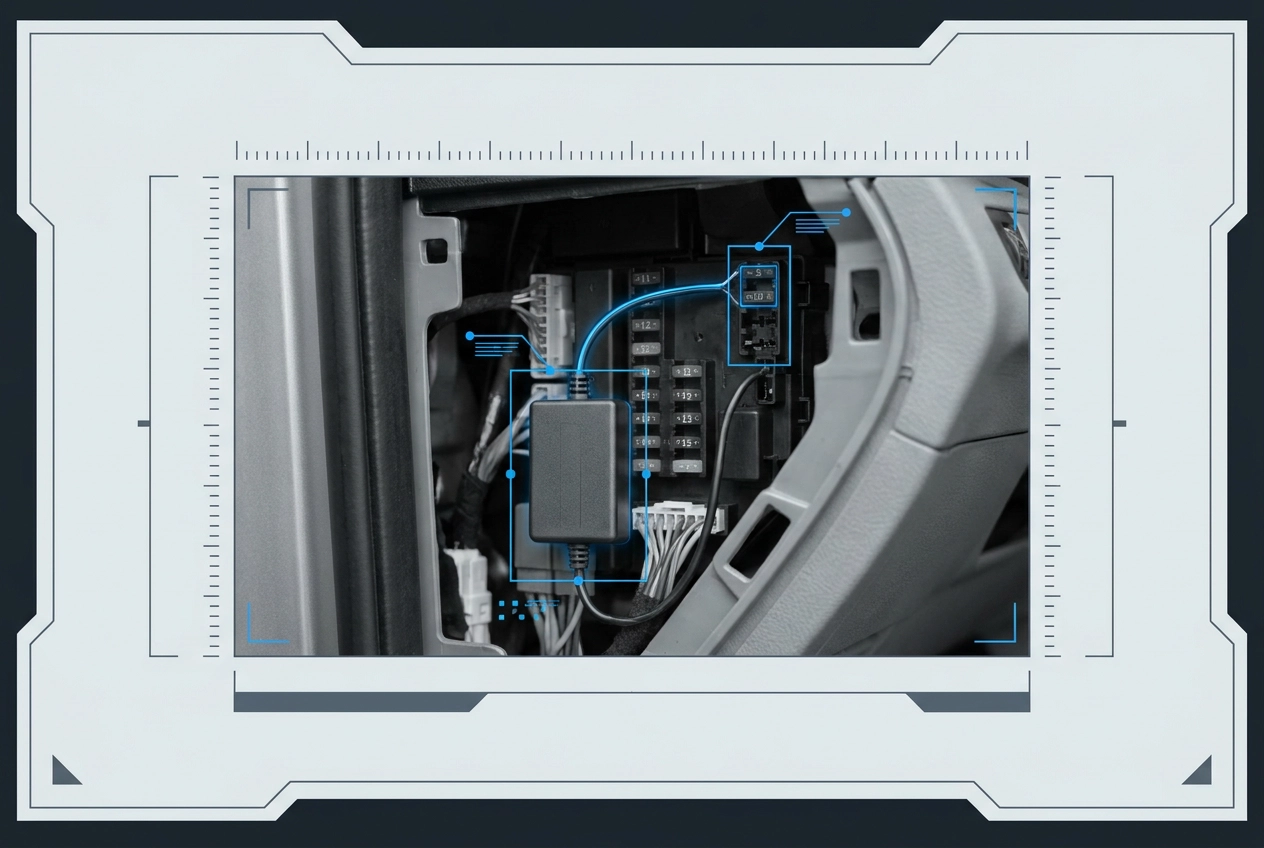
A hardwire kit taps directly into your fuse box using two separate circuits. The first is a constant circuit, a fuse slot that stays live even with the key out, which keeps your dashcam powered while the vehicle is parked. The second is an ACC (accessory) circuit, a fuse slot that only carries voltage when the ignition is on. Your dashcam reads that ACC signal as a cue: voltage present means you're driving; voltage gone means you've parked. That switch triggers the transition between driving mode and parking mode automatically, with no input from you.
By using constant power for operation and the ACC signal purely as a mode trigger, the kit bypasses the ignition-switched problem entirely without ever interrupting the recording.
The Voltage Cutoff Module
The most important component inside any hardwire kit is one most people never think about: the voltage cutoff module. This small circuit continuously monitors your vehicle battery. When the battery voltage drops toward a preset threshold, the module cuts power to the dashcam before the battery falls too low to start the engine.
Without this protection, a dashcam left in parking mode overnight could draw the battery down to a point where the vehicle won't crank, which is a serious problem in any climate and a potentially stranding problem on a cold Canadian morning. The cutoff module is the safeguard that makes extended parking mode use viable. Voltage cutoff thresholds and how to set them correctly for your battery type are covered in the next section.
Clean, Invisible Installation
A properly installed hardwire kit leaves no visible trace inside your vehicle. The power cable runs behind the A-pillar trim and headliner, emerging neatly at your windshield mount. No cables drape across the dash, no adapters occupy your 12V socket, and nothing signals to a passerby that a dashcam is present.
Built for DriveSight
The Hardwire Power Kits available at PhoneDashCam.com are purpose-built for the DriveSight phone dashcam setup, delivering both the constant power and the ACC signal the app requires to switch reliably between driving and parking mode.
Voltage Cutoff Settings: The Detail That Protects Your Battery
Getting this one setting right before you close the fuse box is the difference between reliable parking mode and a vehicle that will not start on a January morning.
Which Setting Matches Your Battery Type
Every hardwire kit ships with an adjustable low-voltage cutoff, and the correct threshold depends entirely on what type of battery is under your hood:
Standard 12V lead-acid battery: set the cutoff to 11.8V
AGM (absorbed glass mat) battery, common in vehicles built after roughly 2015: set it to 12.0V
EV lithium auxiliary system: set it to 12.2V
Setting the threshold too low risks a deep discharge that permanently damages the battery and leaves you stranded. Setting it too high cuts dashcam power well before the battery is actually at risk, making parking mode functionally useless during longer stops.
Why Canadian Winters Shrink Your Margin
In warmer climates, the gap between a healthy resting voltage and a dangerously depleted one is wide enough that a slightly imprecise cutoff setting rarely causes problems. In Canada, that margin narrows considerably.
Cold temperatures measurably reduce a lead-acid battery's effective capacity. A battery may read as adequately charged yet lack the cranking amps required to fire a cold engine. The voltage reading looks acceptable; the actual reserve energy is not.
This is why a stable power source matters so much for parking dashcam use: an incorrectly configured hardwire kit does not just risk convenience, it risks leaving you stranded at a remote ski hill parking lot in February.
The Five-Second Step Before You Start
Before touching a single fuse, identify your battery type. The battery label under the hood will show either "Lead Acid," "AGM," or "Lithium" clearly printed on its case. Your owner's manual confirms this in the maintenance or specifications section.
Match the label to the correct threshold from the list above, set the cutoff dial or switch on the hardwire kit accordingly, and you have eliminated the most common cause of hardwire installation failure before the installation even begins.
What You Need Before You Start: Tools and Parts
With your battery type identified and your cutoff set, you're ready to gather everything before touching the fuse box. Having all parts and tools on hand before you start prevents mid-installation trips to the auto parts store.
Required Hardware
Hardwire kit with both a constant (always-live) lead and an ACC (ignition-switched) lead. The PhoneDashCam.com hardwire kit includes both, along with a built-in voltage cutoff module. For a full picture of compatible hardware, see Everything You Need for a Dedicated Dashcam.
Add-a-fuse adapter (also called a fuse tap) in the correct size for your vehicle. The three common sizes are mini, standard (ATO), and micro2. Check your fuse box cover or owner's manual to confirm which size your vehicle uses before buying.
Grounding ring terminal sized to fit a bolt near your fuse box. Most kits include one, but confirm the ring diameter matches the bolt head in your vehicle.
Required Tools
Fuse puller or small flathead screwdriver to remove fuses without bending them.
Plastic panel removal pry tool to lift A-pillar and headliner trim without cracking or scratching it. Metal tools will damage the clips.
Multimeter to test fuse slots before connecting anything. Verify the ACC slot reads 0V with the key out and 12V with the ignition on; verify the constant slot reads 12V in both states.
Electrical tape or heat-shrink tubing to insulate any exposed connections.
Optional but Useful
Adhesive cable clips or wire guides keep the power cable tucked cleanly behind the headliner and A-pillar trim on the run to your windshield mount.
A small label or piece of masking tape marked on each tapped fuse slot saves significant time during future maintenance or fuse checks.
Before You Open the Fuse Box
Look up the fuse diagram in your vehicle's owner's manual first. In most Canadian vehicles, the interior fuse box sits near the driver's left knee, below and to the left of the steering column, but exact placement varies by make and model.
Also decide where your phone will mount on the windshield or dashboard before running any cable. The hardwire lead needs to terminate precisely at that spot, so plan the routing path now rather than after the cable is already tucked under trim.
How to Install a Hardwire Kit Step by Step
With your tools ready and your mount position planned, work through these seven steps in order. Do not skip ahead, each step sets up the next.
Step 1: Locate and test fuses
Turn the ignition key to the ACC position, then probe fuses one at a time with your multimeter or fuse tester. You need two specific fuses: one that shows voltage with the key in ACC and goes dead with the key out (your ACC circuit), and one that shows voltage regardless of key position (your constant circuit). Common ACC candidates are the radio, accessories, or interior lights fuse. Common constant candidates are the clock, memory, or dome light fuse. Confirm both before touching anything else, fuse box labels do not always match actual wiring, particularly in older vehicles.
Step 2: Connect the ACC lead
Remove your identified ACC fuse and place it in the lower slot of an add-a-fuse adapter. Insert a new fuse of the same amperage in the upper slot. Push the loaded adapter into the vacated ACC fuse slot. Connect the hardwire kit's ACC wire to the adapter's lead. The original fuse still protects its original circuit; the new fuse protects the dashcam circuit.
Step 3: Connect the constant lead
Repeat the identical process on the constant fuse slot: original fuse in the lower adapter position, matching new fuse in the upper position, hardwire kit's constant power wire connected to the adapter lead. Two fuse taps, two separate circuits. This is what allows DriveSight to distinguish between driving mode and parking mode automatically.
Step 4: Ground the kit
Find a metal bolt close to the fuse box, such as a body bolt or dash bracket bolt. Loosen it just enough to slide the grounding ring terminal underneath the bolt head, then retighten firmly. Before seating the terminal, scrape away any paint, rust, or corrosion from the contact surface, bare metal to bare metal contact is mandatory. A poor ground is a common cause of dashcam power instability, and the symptom is often intermittent shutdowns that worsen in cold weather as metal contracts.
Step 5: Set the voltage cutoff
Locate the voltage cutoff dial or switch on the hardwire kit module before you close the fuse box. Set it to match your battery type as described in the Voltage Cutoff section above (see the Voltage Cutoff section above for the correct threshold per battery type). This setting is the single control that prevents your dashcam from draining the battery to the point your engine will not start on a cold January morning.
Step 6: Route the cable
Use a plastic pry tool to gently separate the A-pillar trim from the body, then feed the USB or power cable into the gap and run it up toward the headliner. Tuck excess cable into the headliner edge and bring it down toward your windshield mount position. Leave a short service loop of slack near the mount so you can connect and remove your phone without straining the cable. For a full overview of positioning and setup best practices, see these tips for the best setup.
Step 7: Test before closing everything up
Plug your phone into the hardwire kit, open DriveSight, and confirm the app receives stable power. Cycle the ignition on and off several times, watching whether DriveSight transitions correctly between driving mode and parking mode with each key cycle. Both modes should respond cleanly. Only once that behaviour is confirmed should you press the trim panels back into place and replace any fuse box covers.
What DriveSight Needs to Run Parking Mode Reliably
As covered in the installation steps, DriveSight uses the ACC signal to switch automatically between driving and parking mode, here is what that means for the app's feature set.
DriveSight is an Android dashcam app built to turn your smartphone into a full-featured dash camera, with a straightforward interface designed for everyday drivers, not tech specialists. Parking mode is a core part of that feature set, and it depends entirely on continuous power to function. That's not a limitation of the app; it's how any always-on monitoring system has to work.
How Parking Mode Activates
When you shut off the ignition and ACC power drops, DriveSight transitions automatically into parking mode, shifting into a low-power monitoring state that keeps recording and responds to motion or impact events. When you start the car again and ACC power returns, DriveSight shifts back into driving mode without any manual input required.
What You Get in Driving Mode
Once ACC power is detected, DriveSight's full suite of on-screen alerts becomes active. These include live police location alerts, live police aircraft tracking and alerts, live severe weather alerts, and live speed camera location alerts covering 336,000-plus known camera sites across North America. Every alert is displayed directly on screen, giving you real-time situational awareness without picking up your phone.
For a closer look at how DriveSight's parking mode compares to dedicated hardware dashcam parking solutions, the parking mode breakdown on PhoneDashCam.com is worth reading before you finalize your setup.
Why Continuous Power Matters for Android
Android's battery optimization routines are designed to conserve power by restricting or terminating background apps. For most apps, that's a sensible trade-off. For a dashcam that needs to record continuously in parking mode, it's a direct conflict. A hardwire kit keeps the phone supplied with stable external power, which reduces the pressure on the phone's internal battery and gives Android less reason to intervene and force-close the app.
This matters more in Canadian winters. Cold temperatures put the phone's own battery under thermal stress. Pairing your hardwire kit with a heat protection accessory and a quality magnetic mount from PhoneDashCam.com keeps the phone at a stable operating temperature, preserving both recording reliability and app performance during long cold-weather parking periods.
Common Hardwire Installation Mistakes and How to Avoid Them
Even a correctly selected hardwire kit will underperform if any of these five installation errors slip through.
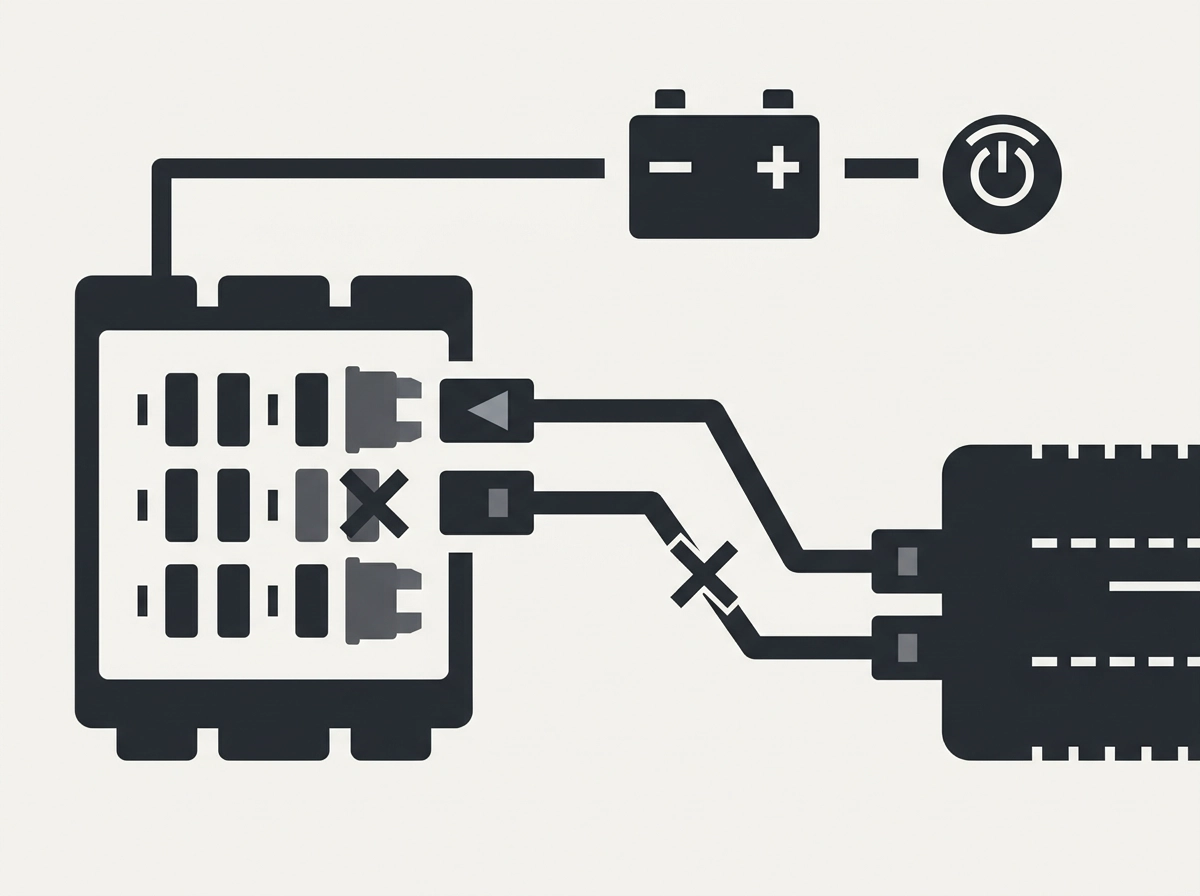
Tapping the wrong fuse type. Both the ACC lead and the constant lead must connect to different circuit types. If you accidentally run both to ignition-switched fuses, parking mode never activates when the engine is off. Run both to always-live fuses, and the dashcam never detects ignition at all, drawing constant power overnight and draining the battery. Confirm which circuit each fuse belongs to before connecting anything.
Skipping the multimeter. Fuse box labels do not always match actual wiring, particularly in older vehicles. A fuse marked "radio" may be wired as a constant circuit, and one marked "memory" may be ignition-switched on a specific trim level. A 30-second voltage test with a multimeter confirms what each fuse actually does: voltage with the key out means constant, voltage only with the key on means ACC. Assuming the label is correct is the single fastest route to hours of troubleshooting.
Poor grounding. A ground wire terminated on a painted surface, or on a bolt that does not bite into bare metal, creates a high-resistance connection. The result is intermittent power loss that is difficult to diagnose and becomes worse in winter, when metal contracts and loose contact points lose their grip. Scrape any paint from the contact area, use a proper ring terminal, and torque the bolt firmly against bare metal.
Setting the voltage cutoff too high. A cutoff calibrated to 12.2V is correct for EV lithium auxiliary systems, but applying that same setting to a standard lead-acid battery cuts parking mode off well before any real drain risk, effectively disabling extended parking protection. Match the threshold to your battery type (see the Voltage Cutoff section above for the correct threshold per battery type), not to a default that shipped with the kit.
Routing cables across airbag paths. Side curtain airbags deploy with enough force to turn any cable tucked behind the wrong trim panel into a projectile. Before routing along the A-pillar or headliner, open your vehicle owner's manual and locate the airbag module positions. Keep all cables on the opposite side of any airbag-marked trim, and use the designated safe routing zones your manual identifies.
Alternatives to a Hardwire Kit: When They Work and When They Do Not
Knowing what can go wrong with a hardwire installation helps you avoid those pitfalls, but it also raises a fair question: are there simpler alternatives that get the job done?
OBD-II power adapters are the option most drivers stumble across first. They plug into the vehicle's diagnostic port and can draw constant 12V power without any fuse box work. The trade-offs are significant, though. The OBD-II port is a single-access point; a permanently installed adapter blocks any mechanic or inspection tool that needs the same socket. More critically, OBD-II adapters often lack a dedicated voltage cutoff, so there is nothing to stop your dashcam from draining the battery overnight. In a Canadian winter, where cold measurably reduces lead-acid battery capacity, that missing protection layer is a genuine risk.
External battery packs take the opposite approach: they power the dashcam from a completely separate cell, eliminating vehicle battery drain entirely. That sounds ideal until you account for the ongoing maintenance. A battery pack requires scheduled recharging, adds another device to manage, and is an awkward fit for a permanent installation where the goal is a clean, invisible setup. It works as a temporary solution but not as the foundation of a 24/7 dashcam system.
Standard 12V socket adapters are the right tool for driving-only use. If you only need DriveSight recording while you are behind the wheel, a socket adapter is simple and cost-effective. The moment parking mode enters the picture, a socket adapter offers nothing. The ignition cuts power; the app stops; the vehicle is unprotected.
For Canadian drivers running DriveSight around the clock, none of these alternatives match a properly installed hardwire kit. It delivers constant power, an ACC signal for automatic mode switching, and a voltage cutoff calibrated to your battery type, which is everything the app needs to function correctly through every season.
Permanent Power Is Not Optional for Canadian Dashcam Drivers
The alternatives have their place, but none of them deliver what a permanent installation does: continuous, reliable power that keeps your phone dashcam recording around the clock, every season, without intervention.
A hardwire kit is the single upgrade that transforms your Android phone from a driving-only recorder into a true 24/7 security system. Without it, your vehicle is unprotected the moment you park. With it, parking and surveillance mode activates automatically every time the ignition goes off, covering the exact window when theft and vandalism are most likely to occur.
One setting determines whether that protection holds through a Canadian winter. Before closing the fuse box, set your voltage cutoff to match your battery type (see the Voltage Cutoff section above for the correct threshold per battery type). That single adjustment is the difference between a dashcam that monitors your vehicle overnight and a battery too flat to start the engine on a cold January morning.
DriveSight's parking mode, continuous recording, and live alerts all require the consistent voltage that only a hardwired connection can maintain through the thermal stress of a Canadian winter. A 12V socket or a drained battery pack cannot guarantee that. A properly installed hardwire kit can.
The complete solution is straightforward. The PhoneDashCam.com hardwire kit paired with DriveSight on an Android phone gives you both the hardware and the software designed to work together. Follow the steps in this guide, set your voltage cutoff correctly, and your installation can be completed in a single session. From that point forward, your dashcam runs 24/7 without any input from you, exactly as a reliable security system should.
Conclusion
A hardwire kit is not an upgrade for Canadian drivers; it is a requirement. A 12V socket cuts power when the ignition turns off, leaving your vehicle unprotected during the hours when theft and vandalism are most likely. A proper hardwire installation solves that completely.
The key takeaways are simple: use a switched and constant fuse tap for reliable power, pair your setup with DriveSight to unlock full parking mode protection year-round, and set your voltage cutoff correctly for your battery type before closing the fuse box.
The complete solution is already available. Pick up the PhoneDashCam.com hardwire kit, follow the steps in this guide, and your installation can be completed in a single session. Your vehicle does not stop needing protection when you walk away. Now your dashcam will not stop either.